When it comes to breaking compiled applications an adversary’s best tools are their knowledge of binary exploitation and reverse engineering. But these tools take an incredible amount of time to build and oftentimes newcomers to the field are deterred by the complexity of the subject. This post will serve as an introduction to the strategies that I discovered over my brief time with working in binary exploitation. Additionally I will be covering the applications of some of the tools that I use including Binary Ninja for decompiling, python for scripting clever solutions, and the linux command line for typical interactions. In this post I will use challenges based on the popular wargame https://pwnable.kr to dive deep into the strategies behind binary exploitation and provide the deepest level of understanding in regards to the mechanisms that dictate each challenge.
Memory Corruption
A wide variety of system level exploits found in the wild use the concept of memory corruption to modify the memory of a running executable in a way that it is not intended for. Memory corruption is directly associated and introduced with the classic buffer overflow vulnerability which has tainted the lives of developers for decades.When searching for this vulnerability it is best to look for a location where user input is being copied directly to a buffer without any form of sanitization or length validation. Given this information we must now fully understand how the stack works so we can exploit our first binary.
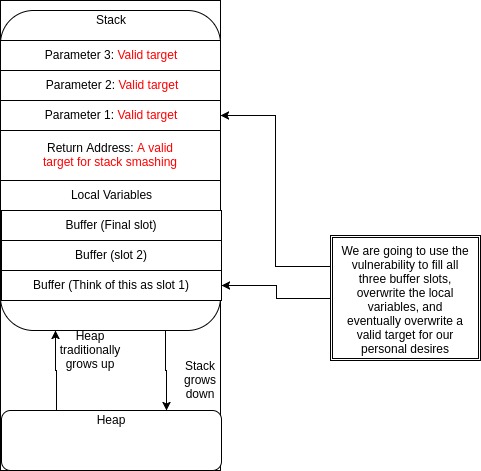
This diagram focuses on the development of the stack when a function is called. At the beginning we notice that the parameters are pushed onto the stack in reverse order. Next the address which the program should return to is pushed onto the stack. For example, a main function calls the foo function on line 10 of some arbitrary c code. An address to this specific line in the code is used as a reference for foo to return to when it is complete. Next to be pushed onto the stack are the local variables for the function followed by our target buffer. For this particular exploit we are going to want to fill the buffer to its maximum capacity and then continue further until we get to the exact location of the value or address which we want to overwrite.
The best place to begin searching for this buffer overflow vulnerability is going to be with a disassembled binary. Throughout the rest of this post we will be using Binary Ninja as our disassembler however many other options also exist such as IDA or even the disas command in gdb.
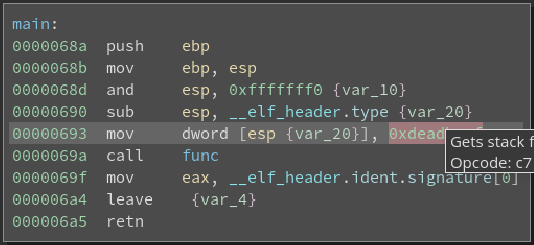
In this image we see the disassembled main function which is essentially just pushing 0xdeadbeef onto the stack as a parameter for the function call func. At this point I have found that the best course of action is to try to rebuild the source code for the binary that we are disassembling in c to better understand exactly what is going on. So the main function will look something like the following:
int main(){
	func(0xdeadbeef);
	return 0;
}
Now let’s look at the func function.
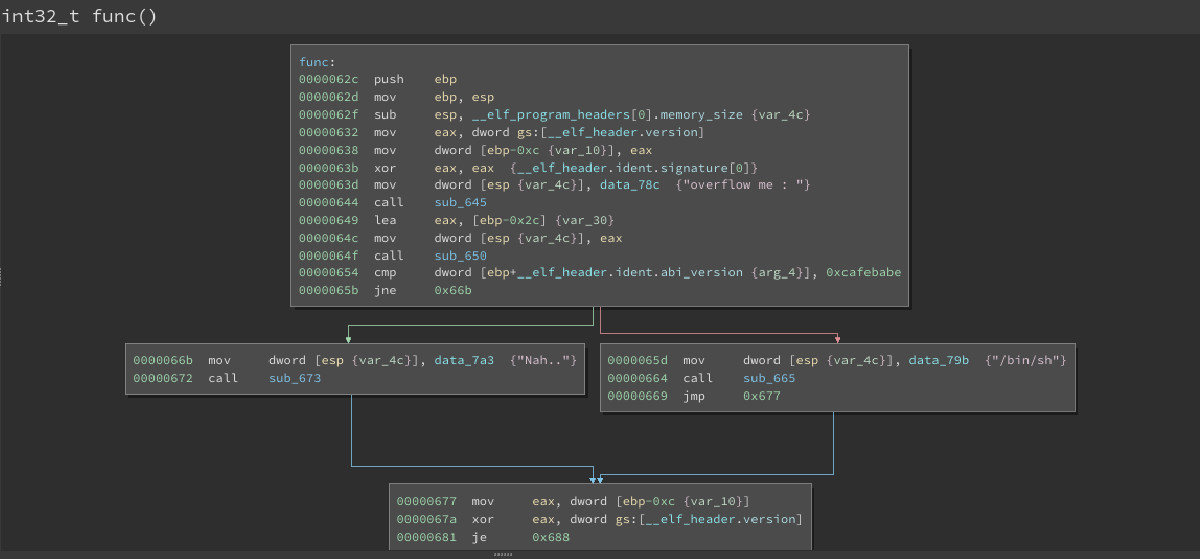
The most important line here is:
0x643 lea eax, [ebp-0x2c] {var_30}
The first line indicates the allocation of space starting at the base pointer (ebp) and moving down 0x2c bytes or in decimal 44 bytes. The assembly also reveals that user input is taken directly from gets and put into the buffer. The contents of this buffer is essentially worthless as the first parameter 0xdeadbeef is compared to the constant 0xcafebabe. Depending on the result of the comparison either a “Nah…” is displayed if the buffer is not the same, or a shell is return if they are the same. The code for this is as follows:
void func(int constant){
	char buffer[32];
	printf("Overflow me : ");
	gets(buffer);
	if(constant != 0xcafebabe){
		printf("Nah..");
	}
	else{
		system("/bin/sh");
	}
}
Now it is just a matter of discovering the correct number of bytes we need to flood in order to overflow the buffer with the value that we desire. On the stack we allocated a space of 44 bytes immediately after the parameters and return address were pushed on the stack. The parameter and the return address take up 4 bytes each for a total of 8 bytes of distance between the value we wish to overwrite and the buffer. This means that if we manipulate the buffer to travel 52 bytes up the stack we will reach the location of the parameters and replace it with whatever we want. The final aspect that we must take in consideration is the endianness of the computer. In this case the computer is little endian so we need to feed the desired value in reverse order. (\xbe\xba\xfe\xca = 0xcafebabe) The easiest way to generate 52 bytes of trash is to use python and then append the desired value onto the input.
python -c "print 52*'A' + '\xbe\xba\xfe\xca'";
This process reveals a vital strategy which is to develop a full understanding of all elements that are subject to the particular exploit you are engaging in. Oftentimes I found myself ignoring vital components of the x86 syntax or even fundamentals of the stack which lead me down a dangerous path of frustration and wasted time. It is best to develop a malleable plan and then break the overall problem down into much smaller parts. This includes keeping track of the code that you have reverse engineered by forward engineering it from the assembly. This will allow you to determine if your intuitions are correct while also giving you a platform to find patterns and spot suspicious interactions.
- Reverse Engineering (2) ,
- Exploitation (2) ,
- Development (3) ,
- Buffer Overflow (1) ,
- Vulnerabilities (2) ,
- Free After Use (2)